WordPress websites are prone to attacks. Why? WordPress is open source so it’s freely available to anyone including the scum who like to hack websites. These assholes look for weaknesses within the coding to exploit so they can hack into websites. I’ve been hacked before and it sucked.
Thankfully iThemes have an awesome plugin that we can use to protect our sites. I only found out about this plugin because the guy who cleaned the malware from my website installed it for me.
And it’s been awesome because the people who hacked my site last time tried again and this plugin blocked it:
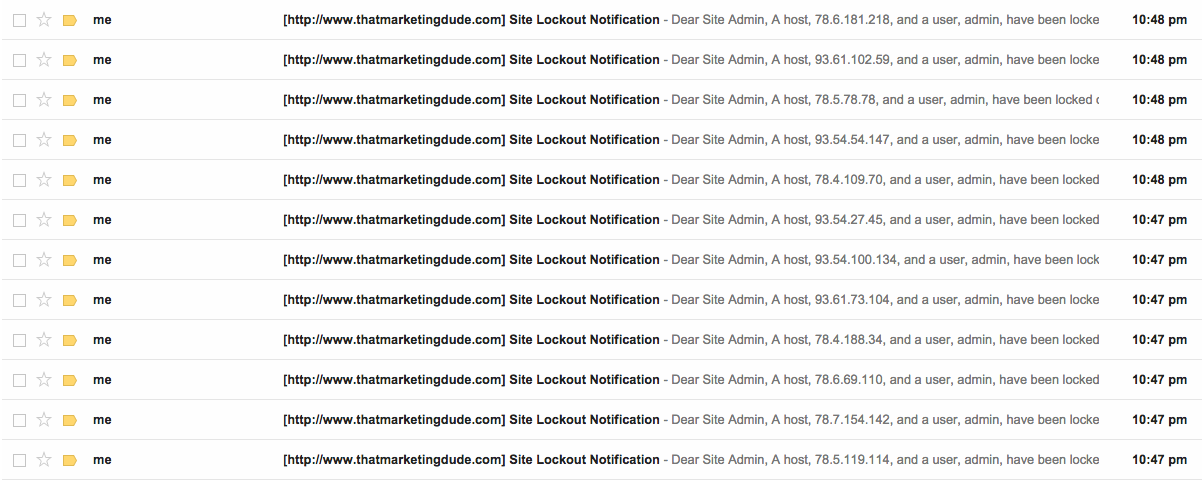
I don’t get these emails anymore.
Let’s dig into setting this plugin up.

WordPress Complete Setup Guide

FINDING THE PLUGIN
The easiest way to find iThemes Security is to head into the plugins section in the WordPress dashboard and search for it. You want to go to Plugins -> Add New -> Search for iThemes Security. You’re looking for this plugin:
Hit install and active the plugin. Once this is activated there’s one very important button to click. You’ll see a pop up with 4 buttons. Mine are red but you’re maybe a different colour depending on your dashboard settings but I want you to look at the 2nd one down:
Make sure you click Allow File Updates. We are going to be making some changes what will effect some of the coding and files in the backend. The plugin can make these changes safely for us if we click that button. So just go ahead and do it… Go on… Do it. It’ll make your life easier. There are lots of things we can change with this plugin but I’m going to show you what I change on every site:
As you can see… Many settings! The first thing we’re going to do is add our own IP address to the whitelist so you’ll never block yourself out of your own site. That’s going to suck if you do that. In the WordPress dashboard go to Security -> Settings -> Global Setting and scroll down the page until you find Lockout White List:
Hit that button and your IP address will automatically be added to the list and then hit the Save All Changes button that’s a little further down the page. Now you won’t get blocked out if you forget your password.
SETTING UP THE BASICS
So there’s only a couple things I change when setting iThemes Security plugin up. I’ll go through them one by one on how I set them up. At the end of this tutorial there’s a video by iThemes about how they recommend you set up the plugin. Anyway, we’ll first look at the Global Settings and the first thing I recommend changing is the blacklist settings:
The blacklist is the list of everyone who has tried logging into your website a specific number of times and failed. This will block their IP address if they to login too many times. The only thing I’ve changed in the settings here is the Lockout Period. It’s set to 15 minutes originally but I’ve changed it to 12 hours (720 minutes). Now if someone fails to login to my site they’ll have to wait 12 hours before they can try again.
Brute Force Protection:

These settings tie in with what we set up in the global settings earlier. You can change the settings here too if you wanted but I don’t bother usually. The only thing I do is tick the Automatically ban “admin” user box as no one should be using admin as a username anyway. Because admin doesn’t get changed by many people or people have created a new user but not deleted admin, this is what most hackers target. By ticking this box you’ll automatically ban anyone who tries to login using the admin username.
If you’re still using admin as your username and login username, then create a new user by going to Users -> Add New and fill out all the details required. Then logout and log back in with the user you’ve just created. Go to Users -> All Users and delete the admin account. If you’ve created any blog posts with the admin account then when you go to delete the user WordPress will ask if you want to attribute all the content to a different user. Select the user you just created and then delete the account. This will block hackers very quickly but it won’t completely stop them.
Force Unique Nicknames:
We’ve stopped the hackers from being able to hack into our sites with the admin user and ban any IP address that tries and fails too many times. They can still try hacking your account with the username that’s creating content. People can use the same username to login to their sites and for the name they’re posting under. This makes hackers jobs easy. So we must force unique nicknames so what username you use to log into the backend of your website isn’t the same username seen when posting blog posts. Head right to the bottom under WordPress Tweaks until you find this:

Tick that box and name WordPress will require that your log in username and your nickname that appears on your site to be different. Now it’s a little harder for hackers to find your login username.
Strong Passwords:
It almost goes without saying that you should be using strong passwords. This is your website, your business we’re talking about here. With iThemes Security you can set it up to make sure all users HAVE to use strong passwords. Here’s how:

Tick the Strong Passwords box and make sure you set the roles to Administrator. This means that every user no matter what level they’re set to have to use strong passwords. Now everyone must set a strong password so it’s less likely to be guessed and therefore less likely to get hacked.
Hide Login Area:
This is my favourite part of this plugin and it’s what stopped all the email warnings saying someone tried hacking my site. If you wanted to log into the backend of your website you’d have to go to your domain name /wp-admin or /dashboard. Well with the Hide Login Area you can change this to something else.
Now you can change it from /wp-admin to something like /yosuckathisismysite which will be harder for the hackers to find. Just make sure you don’t forget what you change it to. This will be the only way for you to get into the backend. You can’t reset it unless you’re logged into the backend. So it can be a little risky but if you bookmark it or something you’ll be ok. Definitely worth the risk because this will stop virtually all brute force attacks on your login area.
A VIDEO WALKTHROUGH WITH ITHEMES
This is how I set up the iThemes Security plugin. When I was doing some research into the details of each setting I found an awesome video by someone at iThemes. It’s a 30 minute webinar about their recommendations on how you should set this plugin up. It goes through what I’ve already mentioned and a few other things like combining iThemes Security with Backup Buddy to increase your protection. I use Backup Buddy to protect all my sites but that’s an entirely different beast. You can create database backups with iThemes Security which is pretty sweet. Anyway, here’s the video:
You may find it easier using the video to set up iThemes Security.
YOUR SITE IS MORE SECURE
If you’ve set it up using my walkthrough or using the iThemes webinar walkthrough, your websites will be 1000x more secure than they were before. I found this plugin after my websites were hacked and this is what Maninder installed on my sites and it worked like a charm.
WordPress Complete Setup Guide
Let me know what you think! Do you use this plugin or do you feel like your site is secure enough without it? Let’s start a little chit chat in the comment section down below.


